Tuesday, March 31, 2009

Thing a Day 2009 - The Swap!

This is SO belated, it isn't even funny. HOWEVER, I couldn't not blog about the beautiful things I got in Groundsel's Thing-A-Day swap! I was partnered with a fabulous jewelry maker, Saro of Saru Star Jewelry.

She made me these beautiful earrings, and they came packaged so nicely!

Thanks, Sayo!

Sunday, March 29, 2009

A Good Day for Fabric Finding!

The other day, I got brave desperate and loaded both my kids into the car, headed for the fabric shop. I had a new custom order that I had to get fabric for, and a hankerin' for some thrift store fabulousness.

First stop, the fabric shop. I was pretty happy with what I found! I had been tasked with making a set of three matching aprons (one for mommy, two for her toddler daughters) for a woman I'd never seen. All I knew about her was that she is originally blond, currently brunette, and picky. (Yeah...try finding something that will flatter that!) I ended up picking out that beautiful teal cotton on the bottom of the stack. The accents (straps and hem) are in the white floral cotton. (The other two pieces of fabric are Just For Fun, because I loved them and think they'll make awesome aprons!)


After the fabric shop came the thrift store! Oh my goodness - I think they'd just unloaded a big shipment. The shop was full of fun stuff. Below are my fabulous fabric finds.


From top to bottom:
1 plaid pillow case (for a boy apron?)
1 navy pillow case (again, boy apron)
1 plaid top sheet (boy apron - seeing a pattern here?)
1 vintage floral top sheet (girly spring aprons, here I come!)
2 hand-embroidered pillow cases (I thought the embroidery would make a sweet accent on an apron bodice)
1 lace-edged bed ruffle (the lace will go to trim up some of my aprons!)
Oh, and I couldn't leave out these two beauties.


I found the doll just sitting on the toy shelf. She had no price tag, so they gave her to me for just $1! She's handmade, and (probably?) Chinese. (We're a Chinese/American family, and I'm always looking for appropriate Asian toys for my toddler girl.) My daughter fell in love with her new "dolly". I know you can't see it in the picture, but she's got the most gorgeous blue silk shoes. Her face is hand-stitched and her pajamas are luscious orange silk. (Satin? I'm awful at naming fabrics.)

The tea pot was in a set of three near the front, by the cash registers. It was the only Chinese one of the three teapots, and only $4. He's sitting on my kitchen shelf now, with two other teapots his same size. Isn't he adorable? Not a chip, not a crack on him.

I got to work on the custom aprons when I got home, and finished them a few days later. Here's one of the toddler aprons, modeled by my own little girl. (We call her Bubba Jyu. Can I just call her BBJ from now on? It's much easier than typing "my toddler daughter" over and over!)


The apron's not quite done. All three aprons are sewn up, but I need to add a little patch with some embroidery to the bodices of all three, mostly so the two little girls can tell their (nearly identical) aprons apart! Any suggestions? I was thinking of embroidering their first initial on a piece of white cotton, and then patching it on to the middle of the bodice.

Friday, March 27, 2009

A Giveaway on I, Wonder Woman!

Oh, kids...I'm so excited about this. You need to click over to I, Wonder Woman and see what's going down. I opened up her blog this morning, and my two year old daughter caught sight of two adorable little skirts at the top of the post. "That's mine, Mommy! That's my shirt!" (Yeah, we're still working on the finer points of Nouns.) Funny thing - the skirt IS hers! So...I'm thinking if I enter this giveaway, it's a bit of an overkill. However, YOU, beautiful readers...wouldn't you like to have a custom made skirt for a special little someone? Seriouisly, it could be a daughter, it could be a niece, it could even be a baby doll!

Head over, and tell Myrnie that Aunt LoLo sent you. She'll know who I am - we are identical twins, after all!

I Wonder Woman: Beautiful Life: Easter Finery and a Giveaway

Wednesday, March 25, 2009

WFMW: Diaper Pails

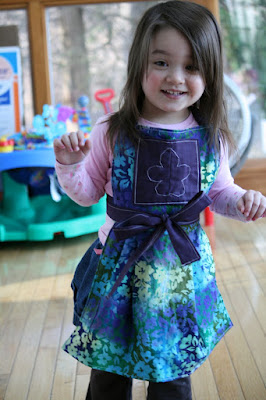
(If you haven't yet, make sure you head over to www.McMommyandMe.com to enter to win a handmade LoLo Craft children's apron. Hurry - you've got until 12 EDT TODAY!)


This has been floating around in my head for a few weeks..I've just GOT to share. Remember, this is just what works for ME...I can't make any promises!

Here goes. I'm a Diaper Expert. I've got two kids under the age of three, and they're both still in diapers. (You may now proceed to both Pity Me and Bow Before My Wisdom.)


When BBJ was born, we made sure we had all the Gear. This included a second-hand Diaper Champ that we picked up from a local 2nd Hand sale. It was clean, odor free, and promised the same for my nursery!

Ummm...Epic Fail. Any of you with any sort of a diaper pail know what I'm talking about. It's fine when the thing's shut, but - seriously? - actually removing the diapers from the pail might kill you!

Here's what I found out - diapers placed in a plastic-lined wastebasket, with no lid, gave off a lot less odor. Hardly any, in fact. (I use grocery sacks.) My guess is that they weren't all inside baking, so...a lot less odor. Besides that, a plastic lined wastebasket holds a lot less than your average Diaper Champ, so the diapers have a lot less time to...ripen?

Finally, look at the fine-print on your box of diapers. The chances are really good that there's a little snippet on there somewhere that instructs you to "empty solids into a toilet before disposing." Ever seen that on there? Trust me - empty whatever you can into a toilet before you chuck your diaper into your open, plastic-lined wastebasket, and everything will smell MUCH better.

So, that's what works for me! For more great tips, head over to We Are THAT Family!

Tuesday, March 24, 2009

Crafty Challenge with ChristyNelson.net

*This just in - make sure you head over to www.christynelson.net and vote for your favorite March Craft Challenge Craft! If you want to, you could even vote for me - the "floppy bunny shaker." The craft with the most votes gets a $25 bundle of patterns. Sweet!!


Oh, kids - this was so much fun. About a month ago, I answered a tweet - "Looking for a crafty blogger."

Ooh, ooh - pick me! I'm a blogger! I'm crafty! I'm a crafty blogger!

Turns out there this cool gal named Christy Nelson who has a sweet little etsy shop, and a monthly Craft Challenge. She wanted a crafty blogger to participate in her challenge, and live to blog about it. So, here I am!


Here's the run-down: You go to her shop and buy the Craft Challenge packet for the coming month. She mails all the packets out at once, and you have until nearly the end of the following month to use at least a little bit of each one of the supplies in the kit to create a Something. (The offerings this month included a tiara, some snazzy flip flops, and bitty Faberge-type eggs!)

I had so much fun with my kit! The March kit included a bit of pink fabric, a few lengths of curling ribbon, two plastic eggs and a handful of buttons and plastic pearls. Everything was in lovely pastels...I immediately thought of Easter!

Not just Easter...but BUNNIES. (I blame LollyChops...) I was imagining a sort of rag-bunny, a sort of a nod to the old rag dolls that my grandmother would have made for herself to play with.

Here's what I came up with. What do you think?


He's got some little buttons inside his belly - they make a nice jolly little rattle! This toy isn't baby proof, by any means, but I think my two year old will be excited to find it in her Easter basket!

I was thinking....Christy sells her packages in a "subscription" format, or a la carte. Wouldn't a 6 month subscription make an AWESOME gift for a budding craftster, kid or otherwise? It's only a few dollars a month, and I think a little parcel in the mail every month could be perfect to get yourself out of any crafty slumps that may arise!

The super fun part is after you complete the challenge - everybody's completed challenges are uploaded to her Flickr pool, put up for a vote, and the winner gets the next month's packet free! (Do you think I have a shot??)

If it looks like fun, make sure you head over to Christy's shop and put in your order for April's challenge - the deadline is 3/27!

An Apron for Mommy

The other day, BBJ (my daughter) had had enough. She was tired of modeling an endless array of aprons, only to have them packaged up and shipped off to other giddy two year olds. We talked about it, and she led me by the hand to my fabric stash. I told her she could pick out any fabric she liked, and I would make an apron just for her.

She chose a white fabric with vibrant pink flowers, from IKEA. (Oddly enough, it matches the curtains in her room! Or, I should say - it's the same fabric I made her bedroom curtains from. hehe)

I chose a rich purple for the embellishments, and went to work.


My project was two-fold, though. See, I have a custom order in the works - a mama apron and two matching toddler aprons. The only problem is - I've never made a mama apron! (Girls, I think you'll agree with me on this one - our tops are shaped a smidge differently than our two year old counterparts, and I just wasn't sure how to make a flattering, chic, girly apron for that!) I used the rest of what I had in that print to do a test-run on the mommy apron pattern, for me!

It turned out pretty cute...but I did hit a speed bump.

(Can you spot the issue in that first picture below???)


I attached the straps to the wrong spots on the bodice! The neck straps made a bow approximately 36 feet across, while the waist straps barely met in the back.

I solved that problem by cutting off the neck straps to the appropriate length, and sewing the cut off bit to the too-short waist straps. Not very professional, but...well, it IS a test run, and it's just for me!


I think this will be my craft apron - the full skirt will do a nice job of catching the bits of thread and fabric that always seem to accumulate in my lap! (I let BBJ pick any fabric she liked...but seriously? White isn't a really practical color to wear in the kitchen!) I just feel like a Domestic Goddess when I put this apron on!

(Sorry for the fuzzy pictures...I took them while the light was good and the kids were asleep....in a full length mirror in the kitchen. My good camera is a little heavy to operate with one hand, so I used my point and shoot. I swear I just cleaned that mirror!)

I still have one question, though - does the mommy apron need a little patch of purple on the bodice, to balance out the purple on the waist and the hem? I was going to do a stripe of purple at the neck, but that just looked...unflattering. Please give me some feedback! You'll probably be seeing one of these mommy aprons hitting the shop soon. Yea!

Monday, March 23, 2009

A Spring Swap!


I just wanted to let everyone know that the sign ups are OPEN for the 6 o'clock stitch's Spring Swap! I'm thinking this is going to be so much fun. The swap is open to international participants, so anyone can play! This is only my second swap, but I'm thinking it's a pretty do-able one. The swap items are small, so I won't feel guilty when I send a set of napkins to someone and get a box full of swag back! (Seriously - are there professional swappers out there that just cruise the Target sales finding seasonally-themed swag?!)

The basic rules are this - your item must be exactly 8x10, and be ready to be framed. However, it cannot COME framed. (This'll save on shipping costs. ;-)) The item must include the colors red, and yellow, and have a SPRING theme. Your swap item can be any media you like - paper, fabric, whatever! It's just got to be framable (is that a word?!) and 8x10.

For the rest of the deets (including deadlines!), click on the banner above. I hope you'll play along!

(Hey, even if you're not going to participate in the Swap, I HIGHLY recommend clicking over the 6 o'clock stitch anyhow! She's an amazing Crafty blogger. She hosts a weekly Mr. Linky where you can post your Etsy Giveaways, Promotions and Sales. She also hosts a monthly Mr. Linky where you can link up your fabulous tutorials. Oh, and she's got this on-going series on promoting your Etsy shop that's just awesome. Love her!)

LoLo Craft Giveaway on McMommy and Me!

So, Sunday morning, I was checking my e-mail and I was thrilled to see an e-mail from McMommy there. See, McMommy doesn't e-mail just anyone...or at least, she's never e-mailed me before! If you've never seen her blog, you should hop over. She's got two adorable little man, she's ridiculously gorgeous, and she's just so funny...you'll love it. She's also really, really popular...hence my star-struck reaction to her e-mail!

A few weeks ago, she decided she was tired of cluttering her hilarious blog up with giveaways and reviews...but still wanted to do the giveaways and reviews, so she branched out and started McMommy and Me.

So, like I was saying, Sunday morning, I got an e-mail from McMommy. It went something like this.

"Hey! I was perusing your blog, and you have a shop and I have a giveaway site, so, I was wondering.....let's put the two things together and have some fun!"

Or something like that. Now, this McMommy - she doesn't waste time. About 12 hours, and 17 e-mails later, we had a giveaway put together! (Why the rush? Well, I really want to get the prize into the winner's hands before Easter!)

So, why are you still here? Head over to McMommy and Me and enter to win! You have until Wednesday, March 25. Good luck!

Oh, what will you win?????

How about one of these!


Tuesday, March 17, 2009

A Flowery Apron

I started this apron last week, for something to work on. I was lacking in inspiration, and so it kind of sat...unfinished...in my projects bag for a few days.

Until this weekend! Our congregation organized a silent auction to raise money for our Young Men and Young Women to attend their various camps this year. Members of our ward donated services, items and experiences. (Seriously - we had everything from flat screen computer monitors to a football signed by Steve Young to Yankee's tickets!) I donated an apron, but was unable to attend the auction to find out who won it.

On Sunday, I found out, and BOY was I excited! The apron is destined for a vivacious little girl in our ward. She has a wacky sense of humor and a head full of gold ringlets. When her mother found out that I was working on a "Hawaiian print" apron at home, she knew that was the one she had to have! Once I knew this apron was meant for that little girl, I suddenly had no problems finishing it off.

I've perfected my skirt technique, and I really like it.


The straps are so long, they wrap around and tie in the front. I love it!

The patch at the top is a pocket, and my first attempt at machine embroidery. What do you think?

My daughter didn't want to part with it, but after I told her who it was for, she relinquished her claim and asked for a movie as a parting prize. Works for me! I sure hope our golden haired friend likes it, too!

Monday, March 16, 2009

Burp Cloth Hack

Faced with a rather messy little newborn, I realized that I was woefully short on appropriate burpcloths. I looked around and found a few flannel recieving blankets that we'd never used. (Seriously, who has kids small enough to be wrapped in those tiny things?!) Perfect!


Here's what I did -


Fold the blanket in half. This will be the length of your burpcloth.


Now, fold it in half the other way, then again. This is the width of your burpcloths. Snip through the folds that are along the long sides. Now you should have four strips of cloth. (I hate to waste cloth - that's why I did it this way. I knew that every piece would be used if I simply cut the blanket into equal pieces!)


Take each strip, fold so that the right sides are together. Sew along the three open sides, being SURE to stop about five inches from the end of the last side.


Clip the corners, turn right side out, poke out the corners, fuld the unsewn bit under, and top-stitch all the way around. (I love topstitching...it keeps things neat, and makes the finished product look so much more...finished. I usually topstitch in a contrasting color, but...white was in the machine, so white is what I used! I tend to do ALL my projects in either white or black. It's my signature move. Ha!)


Voila! Perfect little burpcloths! You can find flannel recieving blankets at the dollar store for $1 a piece, or check out your local garage sales or thrift shops. A perfect little Upcycling project!

For Me??


Awwww...imagine my surprise when I dtumbled bleary-eyed into my son's room to give him his mid-night "schnacks", fired up my laptop...and found an e-mail telling me my li'l ol' blog had won an award!! Su from Vively Online bestowed me with the Sisterhood Award

Can I just say, the crafty blogging community is ABSOLUTELY amazing? This blog is so, so new. I started it, honestly, with hopes that I could share my hobby and meet some other crafters who could mentor me ('cause my crafts could use some mentoring, y'all!) I've met some WONDERFUL crafters, and I've been amazed at the response from some of my Mommy Blog friends, as well!

Thank you.

(How was that for an acceptance speech???)

Now for the fun part - passing this thing on!

Here's the rules:

1. Put the logo on your blog or post
2. Nominate at least 10 blogs which show great Attitude and/or Gratitude!
3. Be sure to link to your nominees within your post.
4. Let them know that they have received this award by commenting on their blog.
5. Share the love and link to the person from whom you received your award.

In no particular order, I pass the love on to...

1. Simone at craftevolution - always supportive, always a great bit of advice for a newbie like me!
2. Dollar Store Crafts - Fabulous crafts for not much $$ - love it!
3. Wee Wonderfuls - Is there anyone who DOESN'T adore her dolls??? And she's working on a book!
4. Lollychops - Fabulous, and generous with her talents, tutorials and patterns!
5. LucyKate Crafts - Oh so quaint and lovely!
6. the crafty conservative - New to me - she has this monthly craft challenge that is SUPER fun. Stay tuned for more details on that one!
7. tiny happy - Oh, how I ADORE her free-style embroidery. She captures the beauty of the world around here with a needle and thread. *swoon*
8. whiMSy love - Gotta love a girl who's a self-proclaimed NERD. She's got some super cute crafts, and she's one cool chick.
9. I Wonder Woman What isn't great about Wonder Woman? She's funny, gorgeous, talented, beautiful, charming, FRUGAL...did I mention she's a real looker? (and my identical twin sister. Seriously! Go check her out!)
10. 6 o'clock Stitch - She has these Mr. Linkys that are awesome. The Make & Tell carnival runs all month and is a great place to get some sweet tutorials. The Etsy Promotion Linky changes weekly and is a place to list all your Etsy giveaways, promotions and sales.

A Giveaway on M&M Studio

First off, I just love the name of this shop, don't you Wonder Woman?

Moving on. I just found out about this giveaway - 4 yards of fabric from this BEAUTIFUL shop. Go here for the details.

Monday, March 9, 2009

Cocktail Napkins - A Tutorial


These are my version of a cocktail napkin. They're not so much for the dinner table as they are for outdoor soirees: picnics in the park, lunches on the lawn, or a little tea party with your friends! They're the perfect size to hold a little sandwhich, or a cookie or any other small finger food - like a little cloth plate! They double as coasters...and I just love them!


You will need:

1/4 yard cotton fabric

Cutting mat, rotary cutter and quilting rule or

Scissors

Thread for your sewing machine


Begin by cutting your fabric - you will need eight 6" squares.


Grab two of your squares and stick 'em right sides together. Line up the edge of the fabric with the right edge of your presser foot and sew along three and a half sides of your square. (Did you get that? Sew three sides, and then half of the last side, leaving a hole so you can turn your square right side out when you're done.)


Clip the corners and flip your little creation right side out. I like to stick a closed pair of scissors inside and poke the corners out so they're nice and square.


Fold the open edges down inside and now line your fabric up with the left edge of your presser foot and sew the opening shut. Continue on around until you've sewn around all four sides - this is called Top Stitching.


Press it if you like...and you're done! I like to do these assembly line style - cut out all the squares, sew them all together, flip them all, clip them all...you get the idea.


These would make great party favors for a little girl's tea party, or a great addition to a summer BBQ.


If you do make these, blog it up and send me a link - I'd love to see what you come up with!!

(The ones in the photo are available at http://www.lolocraft.etsy.com/)
Head over to the 6 o'clock stitch for lots of other great Make & Tell Monday tutorials! The list will be updated all month, so check it out!

Giveaway on the Crafty Crow

Just thought I'd let you know - the Craft Crow is hosting a giveaway today. You can win downloadable patterns from You Can Make This.

Great stuff!

WFMW: Tie-Down Blanket Tutorial

(Yes, this post is an old one...from last week! LOL I'm submitting it for 6'o clock Stitch's Make & Tell Monday - head over to see some other GREAT tutorials! Also, be sure to check out her weekly Etsy page - she has a list of giveaways, promotions and sales!)

Today, friends, we are going to learn how to make the Easiest Blanket in the World. (Or, Fleece Tie-Down Blanket for short.) I made this one in a hurry because once the fleece was laid out, both kids wanted to use the blanket/spit on the blanket/spin on the blanket...and "help" tie the blanket.

Begin by purchasing two pieces of fleece, of equal length. Fleece is very, very wide. (This blanket is about one yard. A pair of three-yard pieces makes a comfortable blanket for a twin sized bed. A yard and a half would give you a square-ish blanket.)

Trim the pieces so that they match exactly. You can cut off the selvage edges (the funky curly edges) if you like, but you don't need to. (You'll see that there is nothing exact about this blanket! It's a very forgiving project.

Lay the pieces on the floor, wrong sides together, so that it is exactly how a blanket should be, with the pretty parts facing out.

Smooth out the fleece, and then start cutting!

Begin by cutting a 6" square out of each corner of the blanket.

Continue from there, cutting slits into the fabric that are 6" deep (to match the squares you just cut out) and approximately 1" apart, cutting through both pieces of fleece at once (top and bottom). Repeat on all four sides of the blanket.

Now, tie 'er up! For each strip that you cut into the fabric, tie the top piece to its matching bottom piece. Do this any way you like, but make sure you use either a double knot it or tie a square knot so the blanket doesn't fall apart. Also, don't do this too tight - you don't want your blanket to come out round!


Here's the blanket halfway done. You can see BBJ "helping" and Siu Jeun testing it out.

And....we're done! Wasn't that simple? This project took me two days, only because Siu Jeun got tired of laying on his new blanket. Cutting the strips takes about half an hour, as does tying the blanket up. Make sure you do this project on the floor - the last thing you want is to do it on a table that is too small and have the whole thing slide off and fall apart before you can get it tied!


I love that it's small enough that a toddler could drag it around with them, but large enough that both kids fit on it fairly comfortably! Fleece blankets make the best playmats because they keep little bottoms warm on our cold, cold floors!

I think he likes it...

Yup...definitely a keeper!

(The fabric for this blanket came from a very generous Freecycler! I had put out a request for fleece to use as stuffing for my little jingle-blocks for the shop. She asked if I wanted a blanket that she was never going to get around to finishing. I almost felt guilty when I realized how close she was to having a new blanket! I couldn't bear to cut the fleece up into scrap when it was so close to being completed...and I'd been thinking of making a new blanket for Siu Jeun anyhow. She had already laid the pieces together, cut the corners out, and cut one side of the blanket into strips. Another 45 minutes...oh well. Perhaps she didn't have little ones at home that needed a new blanket! At any rate, I am very grateful to the generosity of strangers!)

For more Works For Me goodness, head over to We Are THAT Family.

Tuesday, March 3, 2009

Sassy Little Girl Apron

Here's a little apron I made for the giveaway winner on Be Different...Act Normal. I couldn't send her one of the aprons I already had made up, because those ones were designed to fit toddlers. The winner had a toddler girl, and a kindergarten-aged daughter. The toddler already had an apron...but the kindergartner had none!

Well, that just can't be! Every little girl needs their own apron! This was the first apron I made from an upcycled/thrifted sheet.

I think the fabric makes great aprons...but can you imagine sleeping on that?! Seriously - how is bright red gingham checks supposed to make you drowsy?!

Monday, March 2, 2009

Ultimate Blog Party 2009

Oh, kids....this is big. This is HUGE. This is like the biggest block party. Ever.

This is...5 Minute for Mom's Ultimate Blog Party! And it's all going down March 20-27.

(And honestly, I have no idea what that means, because I had never heard about it before last week. BUT, apparently this is a Mr. Linky to end all Mr. Linky's, and involves about 10 million bloggers that all go and visit each others sites and spread the love. Or something like that.)


Ultimate Blog Party 2009

Head over, sign up....we'll figure it out together. Oh, and LoLo Craft (my etsy shop) has donated an apron to the Prize Pile. Woohoo! All the deets are on 5 Minutes for Mom, so click on the banner up there, and let's Party!!

A Craft Fair Apron

I made this this weekend for a special someone (who probably doesn't read this blog, so I'm safe). She's a jeweler who peddles her wares at various craft fairs around NY. I couldn't think of what to make for her, when suddenly I remembered that I am the Apron Lady! And what Craft Fair working lady doesn't need a sassy apron??

It's a pretty simple apron, but I love it. It hits just about at the knees, to catch any bits of paper, string or what-have-you that might fall into your lap while you're crafting behind your table. There's a little pocket on the front, just about hand height, perfect for holding a little sketchbook or receipt book and a pen.


And what apron would be complete without a sassy little bow in the back??

This apron is the second one I've made from a thrifted fitted sheet - doesn't that gingham just scream apron to you??!

(Please ignore the sweats and Mariners t-shirt - we were rather short on perky, skinny, sassy little models on Saturday night, and I wanted photos of the apron for Thing A Day!)