Friday, October 30, 2009

Ties for Guys

...or gals.
The other day, a friend and I headed out on a Grand Adventure (or a GA as my grandmother would call it) to pick up a bag of ties from a generous Freecycler. Imagine our surprise when we finally found the bags...only to discover that they had 8 fab knit ties (straight from 1983!) along with 8 gorgeous (tags still on: $127!) "standard" ties. Squee!

If I get my act together, the knit ties will become ties for Little Men, as nobody cares if a Little Man chews on a cotton knit tie! The silky ones...we're not sure yet. Except for the one in the picture - BBJ has claimed it as her own.
Posted by Picasa

Monday, October 19, 2009

WIP: Cozy Pozy Clips


(WIP = Works in Progress)

As the weather turns cooler, I've had the chance to make a few cozier items for my little princess. Starting with these.

She still adores the silk-flower clips I made her a few months ago, but they were just seeming so out of place. What kind of a winter fairy wears spring flowers, dear readers? I ask you.

Not many.

These little clips are made of red felt (which appears to have some lovely shimmer woven in.) Being ever-frugal, this felt was received as a gift on our local ReUseIt network. (I (heart) free!)

The center was carefully snipped with sharp little clippers, and then pierced with a teeny-tiny star-shaped "brad".

You can't really see it, but the clip was covered in a little piece of tan and cocoa ribbon from my bucket of "ribbon bits." I covered all four sides (top, bottom-top, top-bottom, and bottom) with ribbon. Next time, I think I will only cover the top and top-bottom, as the extra ribbon on the clip makes it awfully hard to slide into my daughter's hair.

What do you think? (They met with my daughter's hearty approval - she has worn the clip daily since its birth last Wednesday. That's a lot of cozy posy-ing.)

(These should be listed in the shop, shortly. As in...when the kids let me get around to taking better photos, etc. If they look like something you'd like to see on your own little fairy princess, drop me a line!)
Posted by Picasa

Wednesday, October 14, 2009

Something Wicker This Way Comes

That's my mantle right now. Do you like it? Oh, wait - you've got to see this.

It's my niece, Bookie. The picture was a gift from her parents...and just seemed to scream to be added to my Halloween decor. Heh.

The other day, I found a smallish wicker wreath at Christmas Tree Shop for only $1. A dollar, y'all! I knew that, for a dollar, I could definitely try my hand at wreath making again.

I'm kind of in love with the idea of decor that will last through several seasons, with "changable suits of apparel", if you will.
So far, I've made this little guy a ghost, a jack o' lantern, a candy corn, a black cat (what? you couldn't tell?) and a pink-eyed bat. I cut them all out of eco-friendly craft felt (the ones made from post-consumer plastic) and glued everything together. Then I glued 15" pieces of ribbon onto the backs so I could tie them onto the wreath. The whole project took about 20 minutes.
Easy peasy! Now, I need to make a cornucopia...a turkey...maybe a pumpkin pie?
*The bow is from a stash of bows I made up last year. They're great for decorating, and can be used on packages over and over. I might use a few to tie our stockings to the banister this year, out of the way of grasping toddler hands! They're easy to make, or I still have a few available in my shop.
Posted by Picasa

Monday, October 12, 2009

Tute: Baby Leg Warmers

This has got to be the quickest tutorial known to man. However, it's been a while since I've seen these little gems making the rounds. Perhaps it is time to resurrect the leg-warmer?


These little leg warmers are awesome for babies and toddlers. They protect little knees when infants are learning to crawl, and stretch out the "wearability" of the summer wardrobe just a leeetle further, by adding long sleeves or long "pants" to those cute summer jumpsuits and skirts.

First, gather your supplies.

You'll need:
1 pair ladies knee-high socks (Use children's knee-highs if you are making these for a bitty baby.)
Rotary cutter
Cutting mat
Straight edge ruler
Pins
Thread
Sewing machine or serger


Here's my pile, all ready to be sewn! Remember, when you're sewing to not stretch the fabric out. If you do, you'll get a weird ridge around the ankle (or wrist, depending on how you wear them).

Also, please note: If you would like the ankle (or wrist) to be a bit more snug, you can cut your "foot tube" open (top to bottom) to make it into a long, fat strip. Then, trim a bit off the short end, and sew it back together. Proceed as outlined above. If you're not serging these, you can "finish" the raw edges with a zig zag stitch.

Or just leave them. Whatever floats your boat.

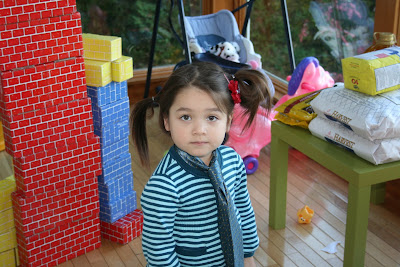
And what would a tute be without some action shots? (Sassy legs provided courtesy of my eldest child, circa January 2008.)


*Note: I got the above-pictured 4-pack of ladies knee-highs at my local warehouse store for around $10. Around holidays, you can often find themed knee-highs at bargain stores for a few dollars. If you ever see knee-highs that would work for a boy, stock up - they're a rare breed, as men tend to not wear colorful knee-high socks. *ahem* Also, fluffy socks are a bear to work with. I recommend you stick to the thin-knit kind.
Posted by Picasa

Saturday, October 10, 2009

My First Free-Motion Quilt


(Sorry for the quality of the picture - it was the middle of the night, and I could only risk One Shot. I'll have a photoshoot with The Quilt later and post it here, m'kay?)

It's done, y'all. I would love to claim that this is my first quilt...but it's not. That honor goes to a sort of rainbow and flannel Big Old Quilt I made when I was in high school. I had no idea what I was doing, but I wanted to make a quilt for my twin sister, Myrnie. I will never know how I managed to pull this off, but I cut out the entire quilt on my bedroom floor, and sewed the entire thing on my mom's sewing machine, on my desk. All while Myrnie slept on the other side of a shared bathroom. Oh, it took a few weeks, but she never knew I was in there sewing until midnight? Really??! (Just to keep the fun of the surprise going, I found the smallest box I could smash it into, and wrapped it up for her Christmas present. When the tape came off the box, the queen-sized quilt LEAPED out of the box. She was quite surprised.)

I digress. This quilt is from a tutorial on Oh! Fransson - her Clothesline quilt. I loved that quilt on first sight, but knew I would need to make some modifications. Namely - it was a lap quilt. I needed a twin sized quilt.

After a lot of talking with a good friend (Thanks, Lynnae!) and some friendly Come On! from a friend who wanted to make the quilt as well, I got started. My friend and I looked for vintage sheets from here to Ohio, and finally gathered up 9 different prints that we were happy with. I need to write another post with all of my changes, for posterity. It wasn't hard to make the lap-sized quilt into a queen sized quilt, but there were many, many trips from the sewing machine to the cutting room upstairs...and those could have been avoided if I'd known how many pieces of everything I would need beforehand!

The quilt blocks are a 9-patch within a 9-patch design. The prints you see are all vintage sheets, and the sashing is unbleached cotton from IKEA. The binding is another vintage pillowcase - folded and handstitched on the back. I did all the quilting using a free-motion quilting foot, and I did it on my student-grade Brother machine with a Janome foot. The backing is a fitted (vintage) sheet that was opened up and cut to size.

I am so proud of myself for finishing this project! The quilt isn't perfect...but it's mine. I love it, and I loved BBJ's reaction when she woke up this morning, all snuggled in under the "present" she's been waiting several months for!
Posted by Picasa

Thursday, October 8, 2009

Going GREEN (and a deal alert)

In this week's Christmas Tree Shop circular, I noticed that they had Martha Stewart craft paper punches (regularly $9.99) in stock, for $3.99 a piece! So, I packed the kids up and included Christmas Tree Shop in our whirlwind errand outing. They had two designs in stock - an aster, and an edging punch. I chose the aster.
The next day, while BBJ slept, Siu Jeun and I went upstairs to have a little fun. I've decided that card making could be a really good hobby for me - if I know what I want, I can go from cupboard to done in about 10 minutes. Since that is approximately the same length of time as Siu Jeun's ability to play by himself without investigating what I'm doing...it's a perfect fit!
This card, obviously, is super simple. Three asters punched out of the right side, and glued onto the left. A piece of scrapbook paper on the front, and a matching one glued inside. Easy peasy! Then, because I had used black paper for the card itself, I glued a piece of white (printer) paper inside for writing on. Snazzy, yes?

I also carved out a few minute to cut out the binding for BBJ's quilt. It was only when I put them together that I realized...I might be feeling a little green right now. Is it the flu season, or just a perverse desire to keep summer around a little longer?

(The quilt is almost done! The binding is sewn onto one side - I just need to hand stitch it down on the backside, and I'm DONE. I finished about half of the hand sewing last night, during So You Think You Can Dance. What's on tonight??)
Posted by Picasa

Monday, October 5, 2009

A Birthday Banner

For the past year or so, I have been admiring various banners that I've seen online. They looked like they could be so easy. But, there was always other projects to take precedence.

Until September.

Daddy was at work, the little girl's birthday was fast approaching, and I knew I would blow a gasket if I didn't sit down and make something that couldn't be eaten, ripped or otherwise maimed.

Enter - the birthday banner!
I made this quick and dirty - literally. I sat down on the floor and, with children crawling all over me, quickly cut 13 triangles out of a long strip of magenta felt. ( I found it in my stash...it came from a freecycler. I had visions of a poodle skirt for BBJ, but...really? Where would she wear a poodle skirt? I had to be practical, dahling.)

And that was all I was able to do without snipping off some toes in the process.
I waited until the kids had gone to bed, and convinced Lo Gung to help me finish - he has words if my projects aren't neat and symmetrical...so I told him to draw the letters out himself. After he had drawn them out onto sheets of acrylic felt, it was a simple matter of cutting them out and gluing them on!

The next morning, I used a straight stitch to sew the little pennants onto a long strip of binding that I had made from an old pillowcase and then sewn shut, for a previous project. (It made great ties for kitty kapes!)

Easy peasy!

Do you think I need another banner for the boy? Or is he Man enough to handle pink Birthday Wishes...
Posted by Picasa

Saturday, October 3, 2009

The Quilt Top!

Well, kids - here's my (little) big reveal! (We could call it my soft reveal?) The quilt top is done. I put hours into it this week, and finally finished it last week.

This project was done with a friend - because I seriously doubt that I would have finished such a step-rich project without her encouragement and prodding! We shopped together and apart, gathering up vintage sheets. Our big break was a very generous woman in a nearby town who had a box full of vintage bed linens she was willing to part with, for free!

There was one little problem - one of the fabrics that we used was simply too small to give us both all of the pieces that we needed. I think we both tackled this problem differently. She went back and cut out itty bitty squares out of the remnants of that fabric, to add to her existing blocks, to finish the pattern.

Me? I took whatever I had left, slapped it together...and was short exactly one small patch. No problem - I just used a piece of cotton left over from a friend's apron order. I cut a patch the same size as my 9-patch and kept on going!

Yesterday, I dragged my PJ'd kids out to a sewing machine shop a few miles from our home, Stitch in Time . Can I just say, I highly recommend them? I pulled up just a few minutes after closing, but the owner was more than happy to let me (and my two kids) into the shop so I could get the darning foot I needed. They have two locations, and the woman helping me assured me that if I could give her 24 hours notice, anything I needed from the larger location could be moved to the small location, which is closer to my home. Hurray for customer service! They specialize in Janome machines there...and I was drooling, just a little bit. They are beautiful machines!


Last night, Siu Jeun was sleeping very ill, and I didn't dare turn on my sewing machine. Instead, I got out a small embroidery hoop and stitched a small love note to the quilt's recipient, my daughter.

What do you think?


I pulled out my new darning foot this morning, just to play around...and I think I'm in love. I penned the words "I Love You" onto a scrap of felt, and them went over it with the machine. Hello, dreamy. So quick, so smooth...it gave me all sorts of ideas. What if I hid little messages in my quilting on BBJ's quilt? I could very easily throw a "Hi, BBJ!" or a "I Love You!" in there! The possibilities are endless.
Posted by Picasa

Friday, October 2, 2009

Loving on my new darning foot


I dragged the kids out yesterday to a fabulous little sewing machine shop a few miles from our house...and returned home with a treasure - my very own Janome darning foot. (Who knew Janome feet fit student-type Brother machines?!) More on that adventure later!

This morning, I decided to try it out. (You know...before I attempt to free-motion quilt on my daughter's new twin-sized quilt. Heh. When I go in for a challenge, I like to make the FALL as big as possible.)

I couldn't believe how easy it was to use that little foot! A quick note with a disappearing pen, a few swooshes and swirls through the machine....and I had my very own little love note.

I think this is the beginning of a long and beautiful friendship.

Posted by Picasa