Thursday, November 4, 2010

Unmatched Matchy-matchy Frames!

Confused? Check it out.

IMG_6387

A quick trip to the thrift store…a pile of wooden frames in various sizes…and a can of spray paint. Voila! Matched unmatched frames.


I pulled a huge box into my driveway, and laid out my frames. Since they were all really inexpensive (read: CHEAP) I had to use a screw driver to open up the metal tabs on the back that held the frames to their insides. Once all the backs, fillers and glass plates were removed, I got started.

IMG_6335

Ming Wai really, really wanted to help…but somehow, I didn’t think that handing a can of black spray paint to a four year old wearing all white would help anything. So, I did the next best thing. I gave her the camera!

IMG_6338

Paparazzi, take it away!

IMG_6364

(Hello, Crazy Tiny Manly Hands.)

IMG_6378

(She takes good pictures! She, of course, kept the camera for the next half hour and proceeded to take 171 pictures of me, her shoes, leaves, the ground, my rear end, her feet, my legs, a tree, a bird, my head..you get the idea.)


The frames are all put back together now…and it’s time to round up some pictures of the kids. I have a wall in the upstairs hall with one. lone. picture, right in the middle. (It’s a Black Apple print, so it’s not such a terrible thing…but, still. It’s lonely!) I hope to fill the wall with memories, faces and smiles. I can’t wait! (I’ve admired this type of frame grouping for…well, for several years now, but I’d never found a suitable cache of wooden frames to use.)

Wednesday, November 3, 2010

Thing 33: Pebbles and Bam Bam costumes revealed!

IMG_7550 IMG_6323 IMG_6329 IMG_7542


Ming Wai came up with her own costume, using what she had around. Her cousin, Ernie, did the same (and went as Rudolph). The two little ones were carefully planned by their mamas. Siu Jeun was Bam Bam, and MiMi was Pebbles. Both costumes were made by me out of quilting cotton, painted with black acrylic paint. Ming Wai helped a bit with the Pebbles costume. *grin*

Tuesday, November 2, 2010

Princess Dress, Final Revision

After Ming Wai went to bed, I stole her dress back from her bedroom and “finished” the edges. I did..something…with yellow flannel. I have no idea what I did, and I certainly didn’t do it right, but…it’s a costume, so I’m not too worried about it!

IMG_7538 IMG_7531

I cut 1.5” wide strips of yellow flannel and then sewed it to the wrong side of the unfinished hems around the cuffs, neck and bottom hem. Then I folded the flannel up over to the right side of the garment, folded the edge under, and topstitched it. I wasn’t careful with the cutting, I didn’t iron the wrinkled flannel, and there are spots that I fudged. But, you know what? Ming Wai has worn it three days straight. She loves it. And that’s what’s important! (I’m afraid that if I wash it, it will shrink or be damaged…so I’ll let her wear it one more day before I put it in peril! haha)


And Siu Jeun? He just likes to sneak into the craft room, because he figured out that that’s where Daddy hid the Rock Band set.


Rock on, dude. Rock on.

IMG_7522

Monday, November 1, 2010

Not Just an Ordinary Quilt

(I am going to push myself this year and use LoLo Craft to participate in NaBloPoMo. Christmas is coming, and I HAVE to get my rear in gear! Hopefully, this will give me the push that I need to get busy!)

They’re just scraps of fabric, like any other scraps of fabric. They’re cut into shapes…diamonds, squares and triangles. I found them in my UFO (UnFinished Objects) box, bound up with a rubber band. IMG_7521
And yesterday, I was ready to tackle them. Ming Wai was my side-kick, busily scribbling away in her coloring books.
IMG_7518
I laid out all the pieces and tried to figure out what goes with what, and where, with whom.
IMG_7520
I can kind of picture it…a starburst, edges filled in with triangles, and then ringed by rows of square patches.
IMG_7519
None of the fabrics are ones that I would choose to go together. They’re not even the same weights of cotton, most of them thin to the point of sheer.
IMG_7515
None of the points match up completely. I don’t think the diamonds were cut completely straight.
IMG_7516
I don’t care though, as it wasn’t me that cut out the diamonds. Or the squares. Or even the triangles. The edges are worn and frayed from years of bundling and unbundling. I can only guess at the original quilter’s pattern, or even if they were meant to go together. Judging by the quilter’s other work, they are meant to go together in one big quilt, but the cutting was never finished.
IMG_7517  
These pieces represent, to me, what quilting ought to be about. I’m sure they were all cut from cast off clothes or bed linens. Years of memories, cut apart and sewn back together to give it one last shot at life.

My Great Grandmother Susie, I believe, cut these out when she was alive. She was a quilter, but not like the Quilters of today. She made quilts because she needed quilts. I quilt in her memory. I have never bought $12-per-yard designer quilting fabric, and I’m not sure I ever will. I prefer to keep on in the Todd style, and use what I have on hand, the more memories the better.

After Great Grandma Susie passed on, her daughter (my Grandma Mary) started piecing these together. At least, I think this is the quilt I remember her working on. I remember her sitting in my parents living room, during a week-long babysitting stint while my parents were vacationing, and trying to put these together. She worked with a needle and thread. I work with a machine. I hope to piece together enough blocks to make a pillow each for the women of the family. The ones who remember Great Grandma Susie, and the ones who miss Grandma Mary the most.

The corners, no doubt, will be wonkier than I mean them to be. The pattern, no doubt, will be nothing like Mary or Susie envisioned. But, it will be ours…to remember them.

Thursday, October 28, 2010

The Ghosts, Revealed!

I first blogged about these here. (Go back to that post if you want instructions. It’s super simple – a balloon, two sheets of tissue paper, some glue and a few drops of water.)


And now..here’s the finished product.


IMG_7471

They’re so scary, even the heads of the ghosts that have lost their heads are scared!

IMG_7470

It’s OK, weird head-only ghost. Not everyone can be super scary and hang from the ceiling all cool like.

IMG_7468

Wednesday, October 27, 2010

Things 31 & 32: Halloween Costumes

After seeing a fabulous tutorial on ikat Bag this morning, I decided to just get my rear in gear and break out the sewing machine again. I hit a few speed bumps, but overall, I’m really pleased with my day’s work!


(Both costumes ended up being way too small on the bottom, but a few slashes, and a few extra triangles of fabric, fixed the issues!)


These certainly aren’t perfect, but Ming Wai, at least, adores hers! I finished it after she went to bed (since she wouldn’t agree to take it off before then!) and it’s a little more finished now. I used lemon-yellow flannel to finish all of the hems. I’ll get pictures of that later!

IMG_6316 IMG_6310

Siu Jeun is going to be Bam Bam for Halloween. He…wasn’t pleased about me stripping his clothes off him, and stuffing him into this thing. Heh.

IMG_6311  IMG_6313 IMG_6315

I might blow up this picture and frame it. It just makes me giggle!! (I know, I’m awful.)

IMG_6312

Monday, October 18, 2010

Tutorial: Tissue Paper Ghosts

I got it into my head this season that Halloween simply would not be Halloween this year, unless some glue and tissue paper were involved.


And so, I invited them to the party. This project was inspired by one I saw in a Martha Stewart magazine when I was in college. And…you know, when I say “inspired” I really mean that I saw it in Martha’s magazine, and then made it from memory using what I could find around the house, and NOW (ten years later), I’m really just stealing the Mod Podge, balloons and tissue paper from the party.


Now that we’ve got that all cleared up, let’s move on.


   IMG_6293

I had originally intended to make little balls that looked like mummies, using thin strips of white tissue paper. It…well, it didn’t work out that well, since mummies have arms and legs and a neck…and balloons have none of those things. I ended up giving my strips, and some truly tiny balloons, to my daughter to use.
IMG_6294

I am simply too cheap to buy real Mod Podge, so I made my own. I found bottles of glue at the office supply store on clearance after all the Back to School sales were over. At only $.20 for a bottle, I figured that even if it didn’t work out, I still wasn’t out too much for my little experiment.


Luckily, a squirt of cheap Scholastic glue, with a few drops of water, makes a perfectly acceptable glue spread. (What do you call it if it isn’t real Mod Podge??!)

IMG_6295

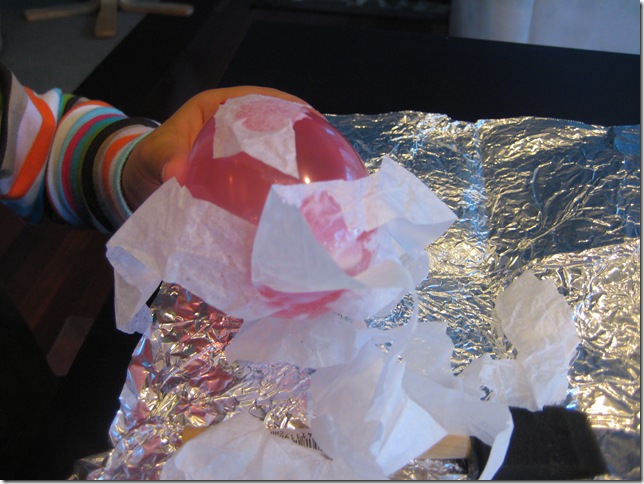
I decided to move on to ghosts. I used a 6” balloon, and sheets of white tissue paper, cut into three or four wide strips down the long side of the sheet. Paint the top and top sides of the balloon with your glue, and get to work. Lay a strip of paper onto the balloon, centering it on the top, and then paint again lightly with your glue to stick it down. Make sure that the edges are stuck, especially. For clarity’s sake, let’s say that strip is laying down 12-6, if it was a clock. Pick up your next strip of paper and lay it onto the balloon, perpendicular to the first strip , 3-9. Top that with a coat of glue, and lay your next strip down sort of 2-7, and top that with glue.

IMG_6296 

Keep going, alternating directions, until you have at least 2-3 complete layers of paper (about 9 wide strips). It does not take much glue….just enough to moisten the paper and stick it down.

IMG_6299

Now go check on your kidlet. She’ll probably declare herself done. (I had her working over a piece of tin foil so that she wouldn’t get drips on the table.) Check out that masterpiece!

IMG_6298

She made sure to tell me that the pink one is a girl ghost, and the blue one is a boy ghost. (We bought a few fish this weekend, and she’s sort of on a name/gender/setting up pretend families kick now. She hasn’t named her ghosts. Yet. But I’m sure she will in the morning!)

IMG_6297


When the glue is all dry (which should happen overnight), carefully dip your finger into some black craft paint and give your ghosts eyes. Then, carefully pop the balloons with a small snip from your scissors. As the air comes out, the balloon should pull away from the tissue paper, leaving you with your ghost! (If it doesn’t pull away, tug it gently, and it should come unstuck.)  I currently have one of these guys set up on my mantle, but once this new flock is dry and eye’d, I might string them up and hang them from the chandelier by the front door. I’ll be sure to get pictures up when the ghosts are all set up!


How are you decorating for Halloween this year? Do you have any quick and or cheap crafts to share? Let us know in the comments!