Friday, August 28, 2009

A Present for BBJ

A few weeks ago, when I was making this baby quilt for a friend, my daughter got jealous...as two year old girls are wont to do.
She first wanted to know if the quilt I was working on was for her. (No.) Who is it for? (Baby Clyde.)
Then the kicker.
"Where's my present?"
(Only, it was way cuter because she has issues with her "s" sound, and they end up just being a sort of a nasal sort of a *snuffle*, and she really said, "Where's my pre'hjnent?" See? Way cuter. Moving on.)
Thinking quickly, because I rock like that, I assured her that she had a "pre'hjnent" in the works, and I would get to work on it just as soon as she left me in peace long enough to finish Baby Clyde's "pre'hjnent."
Score one for mommy!
Wanna see what I was talking about?
Click over here.
Go ahead. I'll wait.
*
*
*
Isn't it gorgeous?! A friend and I are following the tutorial and making twin-sized girlie quilts. (We modified the original pattern, which was a 3x3, to make it 3x4. We'll modify the sashing a bit, too, to make the quilts long/wide enough to cover a twin sized bed.)
Funny story - as we started gathering the vintage sheets we wanted to use, we scoured several thrift shops in the area. My friend even found a few gems when she went home to Ohio to see her folks. We were still short a few prints, but we started prepping what we had anyhow. As we went through our fabrics, my friend noticed that one of our fabrics (a green affair, with little pink and white flowers) was identical to one of the fabrics that the author of the tutorial had used. Weird, right?
It gets better.
I put out a call on our local Freecycle network to see if anyone had any old floral sheets languishing in their linen closets. Lo and behold, someone answered my call. When I went to pick up the sheets, guess what I found mixed into the bag.
The same green sheet.
Are there any linens experts out there that could tell me why every search for vintage bed linens seems to turn up this particular sheet??!
(Note - I'm so proud of myself because, today, I finished sewing up all those scraps in the shoebox below into 9-patch blocks. Woot!)
Do you see that lovely print, on the left hand side of the second row? That's the crazy sheet that everyone seems to have in their closets!
So, here's where I beg for y'all's input. If you clicked over to see the quilt tutorial, you would have noticed that her quilt has white sashing (the stripes between the little 9-patch blocks). I had intended to do white, but looking at the block in the picture above...there's already a lot of white going on. What color do you recommend?
Posted by Picasa

Thursday, August 27, 2009

Fabric Covered Notebooks (a tutorial)

Greetings and salutations! Are y'all ready for a really quick, easy back to school project?

You are? Really??!

Then let's get started!


These are super simple...and oh, so fun.
If you're going to make them, now is a GREAT time - composition notebooks are on sale at Target, $.50 a piece! (They're usually only $1.09, though...so, either way - not an expensive project.)
I based them off of a tutorial online...but, of course, now I can't find it!! (If anyone knows where the tute is, let me know, and I'll link up? Thanks!)

The original tute had you use Wonder Under, or a similar fusible web, and you ironed the fabric on. I improvised, taking into account my composition notebooks (as opposed to the more expensive moleskine notebooks from the tute) and the different adhesive. Ready?


Gather your materials. You'll need:
1 tapebound notebook (spiral just won't work for this project)
spray adhesive (I use the Scotch stuff with the purple lid)
Fabric (I like home dec weight, but anything will do)
Scissors


Lay your fabric out on the table, wrong side up. Open up your notebook and lay it on the fabric. Measure the notebook, open, and cut out a rectangle of fabric that is 1" larger than the notebook, all the way around. (For example, my notebook's dimensions are 9 3/4" x 7 1/2". That means, my notebook, open, is 9 3/4" x15". So, I rounded up: I needed a rectangle of fabric that was 12" x 17". Make sense?)


At this point, lay your fabric over the cover of your book and look carefully - can you see the pattern of the cover through your fabric? If you can, then you might want to stop and cut some solid-color paper the same size as your notebook covers. Glue those down with a glue stick, and then proceed to cover the notebook. Make sure your faux-covers cover the cardboard section, only, and don't go over onto the black binding tape.


Lay out some newsprint or something else that will protect your work surface - you want it to be MUCH larger than the piece of fabric you're spraying. (Unless, of course, you LIKE to have your sewing table sticky for the next two weeks?) (Alternately, just lay your fabric on your porch, spray it and run inside to finish the rest of the project. Your call. Even WITH precautionary measures...my work station always gets really sticky after this project.)


Now, lay your fabric out, wrong side up. Spray it with your spray adhesive, making sure to get it all the way to the edges.
Grab your closed notebook and press the spine to the center of your piece of fabric.


Now, carefully open up the front cover of your book and press it to the fabric, leaving the back cover vertical.


Now, close the book towards the front cover, then flip the book onto its back cover and press to adhere the fabric to that side. Make sure you smooth out any air bubbles and that the book can be opened and closed - that's why you stick one side and then the other.


Open the book back up, and cut a slit above and below the spine of the book. Next, cut out squares at each corner of the cover.


Open one cover of the book and fold down the extra fabric. First, the top, then the bottom, then the side.

Repeat with the back cover, and you're done!


There. Wasn't that quick and painless?! Once you've got your materials laid out, you can whip these out in just a few minutes each.

Let me know if you do this project - I'd love to see pics!


*Shopping notes - I bought my spray adhesive at JoAnn's, my notebooks at Target (on sale, currently, for $.50 a piece, usually $1.09) and my fabric is from IKEA. Our IKEA here seems to have a sale each May where one line of their fabric is on sale for $.99 a yard. This year, it was several gorgeous canvas prints, the Katarina line. If you've never checked out the fabric at IKEA, please do so! It's really lovely, and quite high quality. You'll find it in the drapery and rug section, not in the showroom.

Wednesday, August 26, 2009

Ridiculously Proud of Myself

(Did you guess what I've been working on? They're Kitty Kapes! One of Lo Gung's co-workers requested some flannel capes to keep her feline friends warm this winter. She did a trade with us...a new video game for Lo Gung in exchange for two kitty kapes. Once I realized that I was being given the OPPORTUNITY to make a kape in exchange for a game that only Lo Gung would play...I got him to sweeten the deal with a new paper cutter for me. Now we're all happy! Come to think of it...last winter was so cold here, I'm tempted to make a cape for Siu Jeun as well! He crawls around on all fours...it could work!)
Now, this pile of loveliness right here...is something that just makes me so very proud of myself. I love to sew aprons. These kitty kapes are quite fun to make as well. HOWEVER. I detest making ties, straps...whatever you want to call them. They are fiddly and never turn out straight, or I miss an edge when I'm sewing and have to go back over it...or I sew them inside out and am then stuck turning tiny little tubes inside out for half a day.
That's all about to change, my friends. Behold: 5 yards of skinny little ties!
These were really simple to make. I cut a white pillowcase open along the seams, then cut it into 1" strips. I sewed those strips end to end to make one ginormously long strip, then fed that strip through a 1/2" bias tape maker. After that, it was a simple matter of folding the tape over and sewing the entire length of it. Easy peasy! To make my ties, I just cut off whatever I need and sew it on to my project.
*sigh*
I love a happy ending!
Now, I just need to find a 2" or 4" bias tape maker so I can make up a BATCH of straps for my aprons...
Posted by Picasa

Friday, August 7, 2009

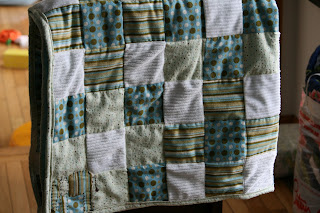
A Wee Little Baby Quilt

Goodness, but I've been MIA, haven't I? I was waiting to post this until after it was presented to its new owner. The baby shower was a week ago. Think it's time to post yet?

This was a group effort. One girl sewed the patches into strips, and another girl sewed the strips together to make the quilt top.
My job was to quilt and bind the...quilt. (Confused?) I added a little surprise in the corner - can you see it?
Posted by Picasa
I used the tutorial for binding from Oh, Fransson, and it worked out so well.